Category Archives: DIY

How to Make a Donut Bouquet

Did you know that National Donut Day is the first Friday in June? Did you know it’s not just a gimmick developed by the donut conglomerate to push its pastries on the it’s-national-whatever-day calendars? Do you even care about the “how and why” since we’re talking about the deliciousness that is donuts?

As it so happens, the first National Donut Day was celebrated in 1938 by The Salvation Army in Chicago to help raise needed funds during the Great Depression and to commemorate the work of the “donut lassies” who helped make the donut what it is today by feeding the tasty confection to American soldiers during World War I. The donuts became synonymous with The Salvation Army, as well as the American soldiers who were returning home with the nickname, “doughboys.”

I like a national day with some solid history and philanthropy behind it. So anyway, I did not find this out because of random Googling. I found out through desperate Googling. I discovered National Donut Day was a thing because my daughter came to me one hour before midnight on the first Wednesday in June and asked, “Is that florist still open near the school?”

“Um, it has been closed for about five years. Why?” I asked.

“Because I need flowers for the band director for Thursday night,” she said.

My husband uncharacteristically chimed in, “Would he even want flowers?” (“Uncharacteristically” because he usually avoids input on all things gift related so I can’t blame him later. This tactic works about 10% of the time.)

And thus a debate was launched about the likes and dislikes of our fabulous band director who deserves all the good things in life and this said discussion ended with me saying, “Sure I can make a donut bouquet. I’m sure it’s on Pinterest.”

Guess what? There are not any good donut tutorials on Pinterest. I nearly fainted dead away. Good thing I am a Craft Queen with the ability to publish my own material on the interwebz.

See, all I could find were donuts stuck on sticks in a vase. That’s great if you like stale pastries. Also, that design is not portable, like, AT ALL. My daughter had to get it to school, put it under her chair on stage, and then present it at the end of a concert. Yeah.

Also, I have taken a turn or twelve thousand through the kitchen creating outlandish bake goods and I just didn’t believe that donuts would stay on skewers extremely well. Spoiler alert: I was right.

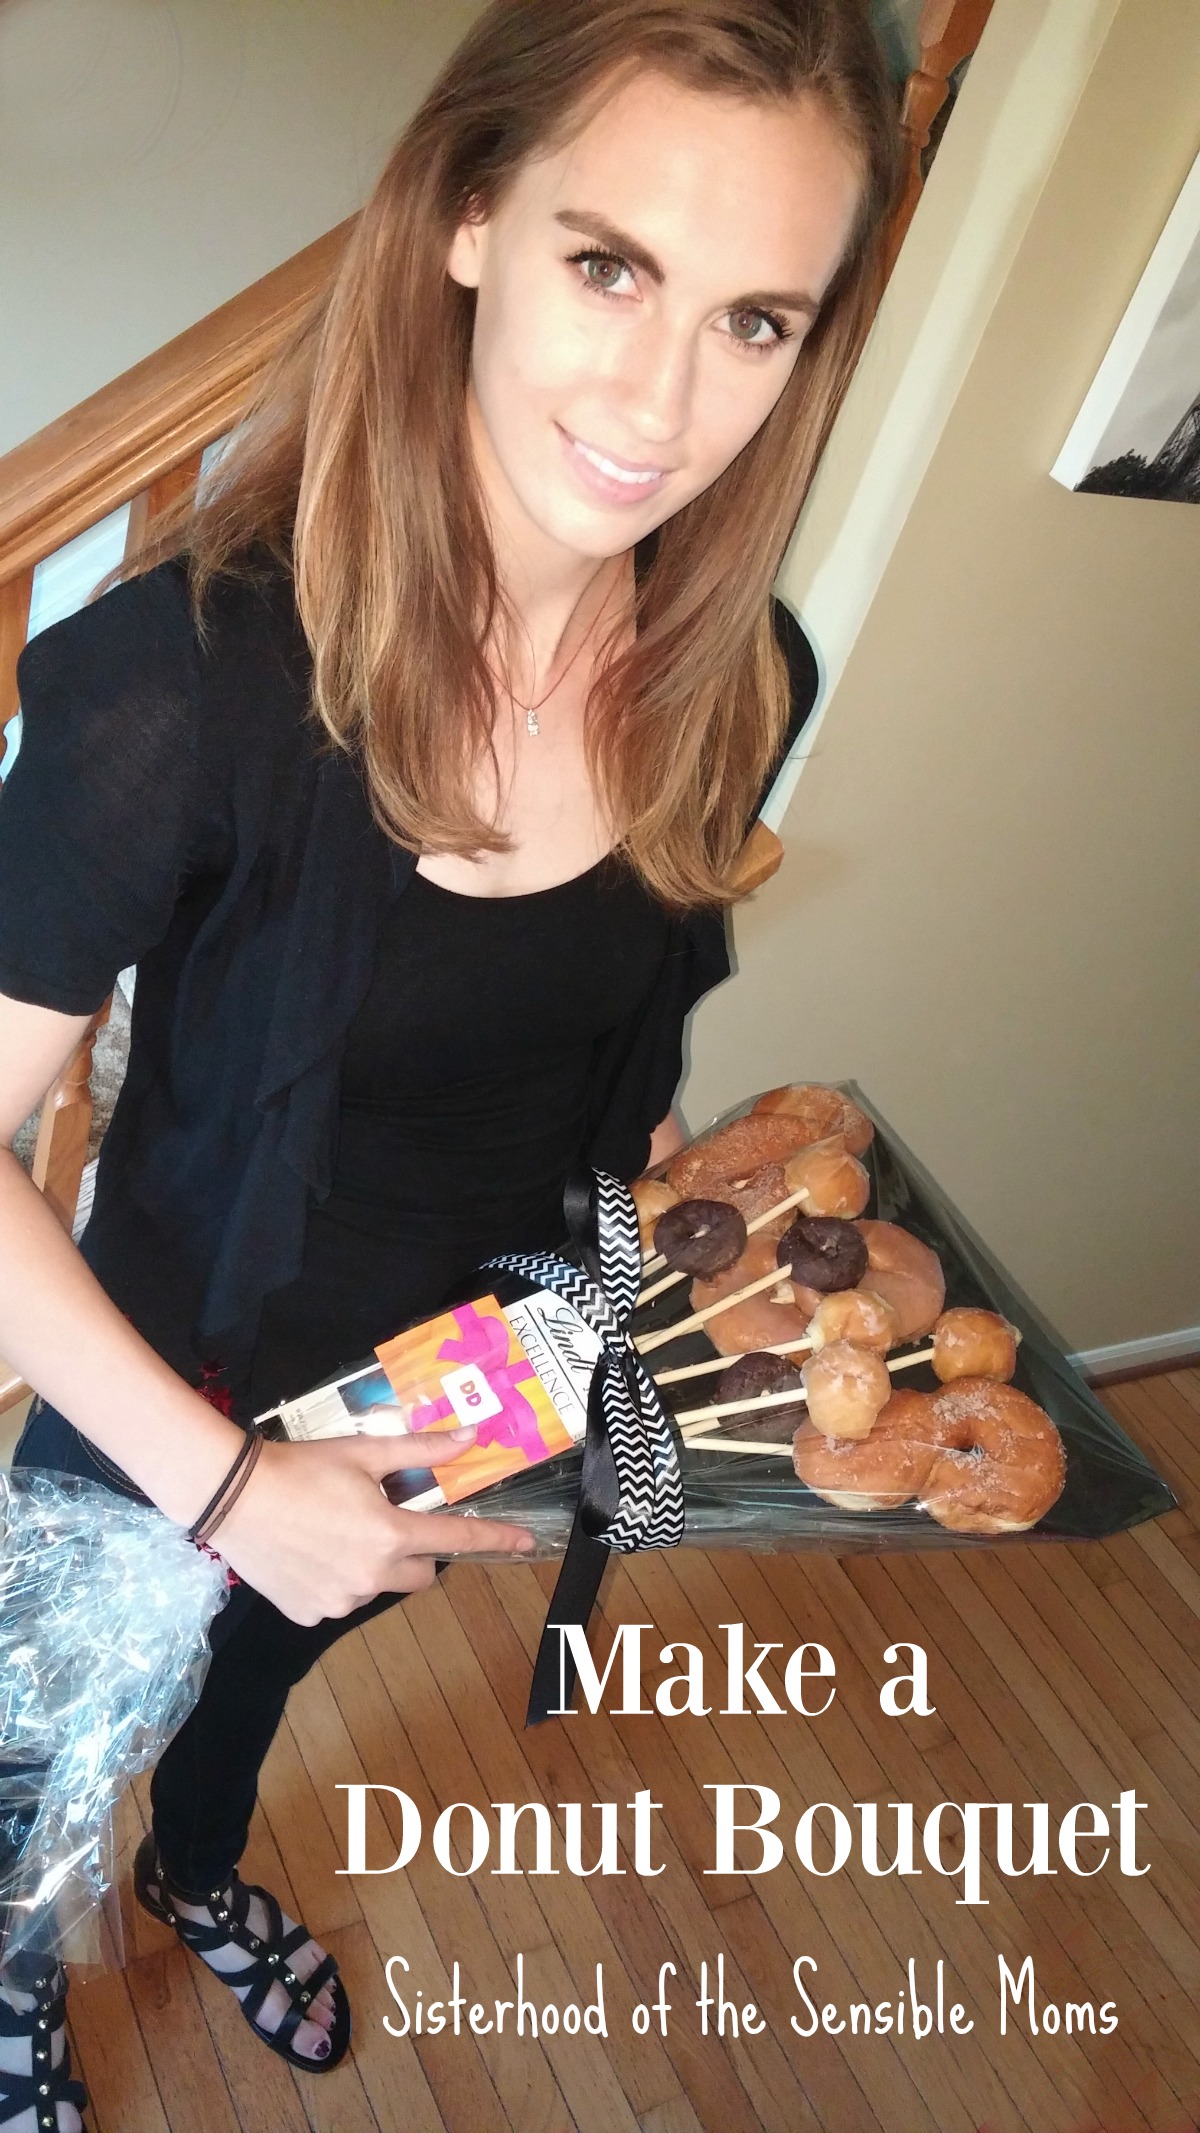
So here was my answer: a design that was more along the lines of a Miss America bouquet. Not counting getting the materials, it truly only took me 30 minutes to construct. It worked out great: scoring huge points for portability, mess containment, and wow factor.
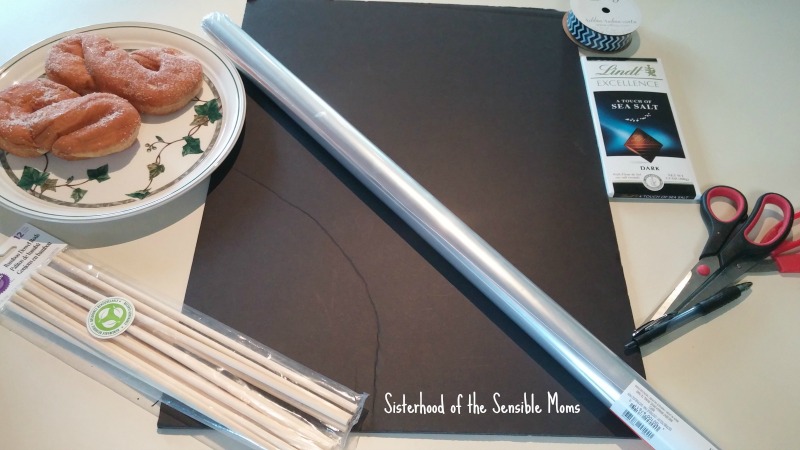
How to Make a Donut Bouquet (Tutorial). Deliciously perfect gift for National Donut Day or any occasion! Quick, easy, and impressive: everything a craft project should be. | Sisterhood of the Sensible Moms


Materials

  • Donuts (do not get ones with filling)
  • Candy bar
  • Cookie Sticks or Bamboo Dowel Rods
  • Foam Core Board
  • Duct Tape
  • Clear Packaging Tape
  • Ribbon
  • Decorative Wire Garland
  • Clear Cellophane Gift Wrap

How to Make a Donut Bouquet (Tutorial). Deliciously perfect gift for National Donut Day or any occasion! Quick, easy, and impressive: everything a craft project should be. | Sisterhood of the Sensible Moms

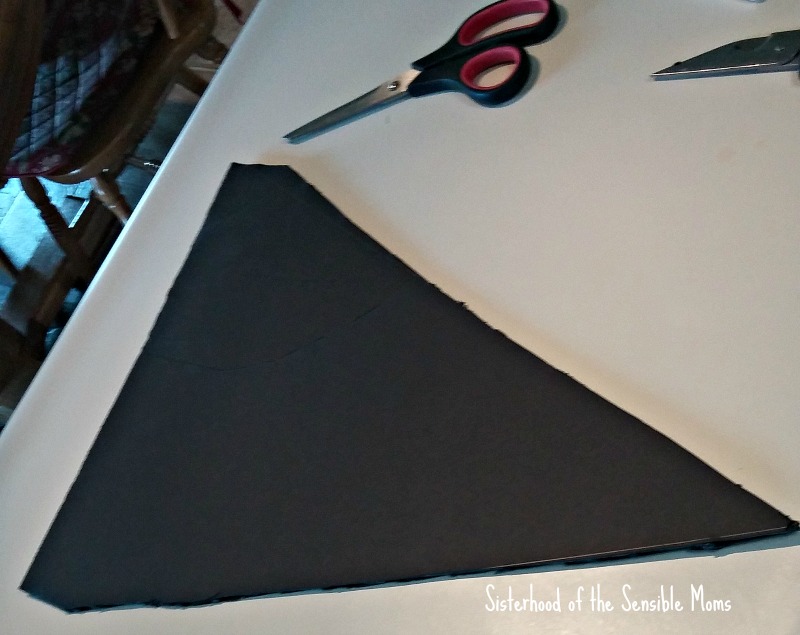
1. Cut the foam core board into a triangular shape. This is easily done running a box cutter or rotary cutter along a ruler as a guide. (Don’t do this on your counter. Use a cutting mat, or like I did, the garage floor.) I trimmed the points off of the top angles so that it would be easier to wrap later.

How to Make a Donut Bouquet (Tutorial). Deliciously perfect gift for National Donut Day or any occasion! Quick, easy, and impressive: everything a craft project should be. | Sisterhood of the Sensible Moms

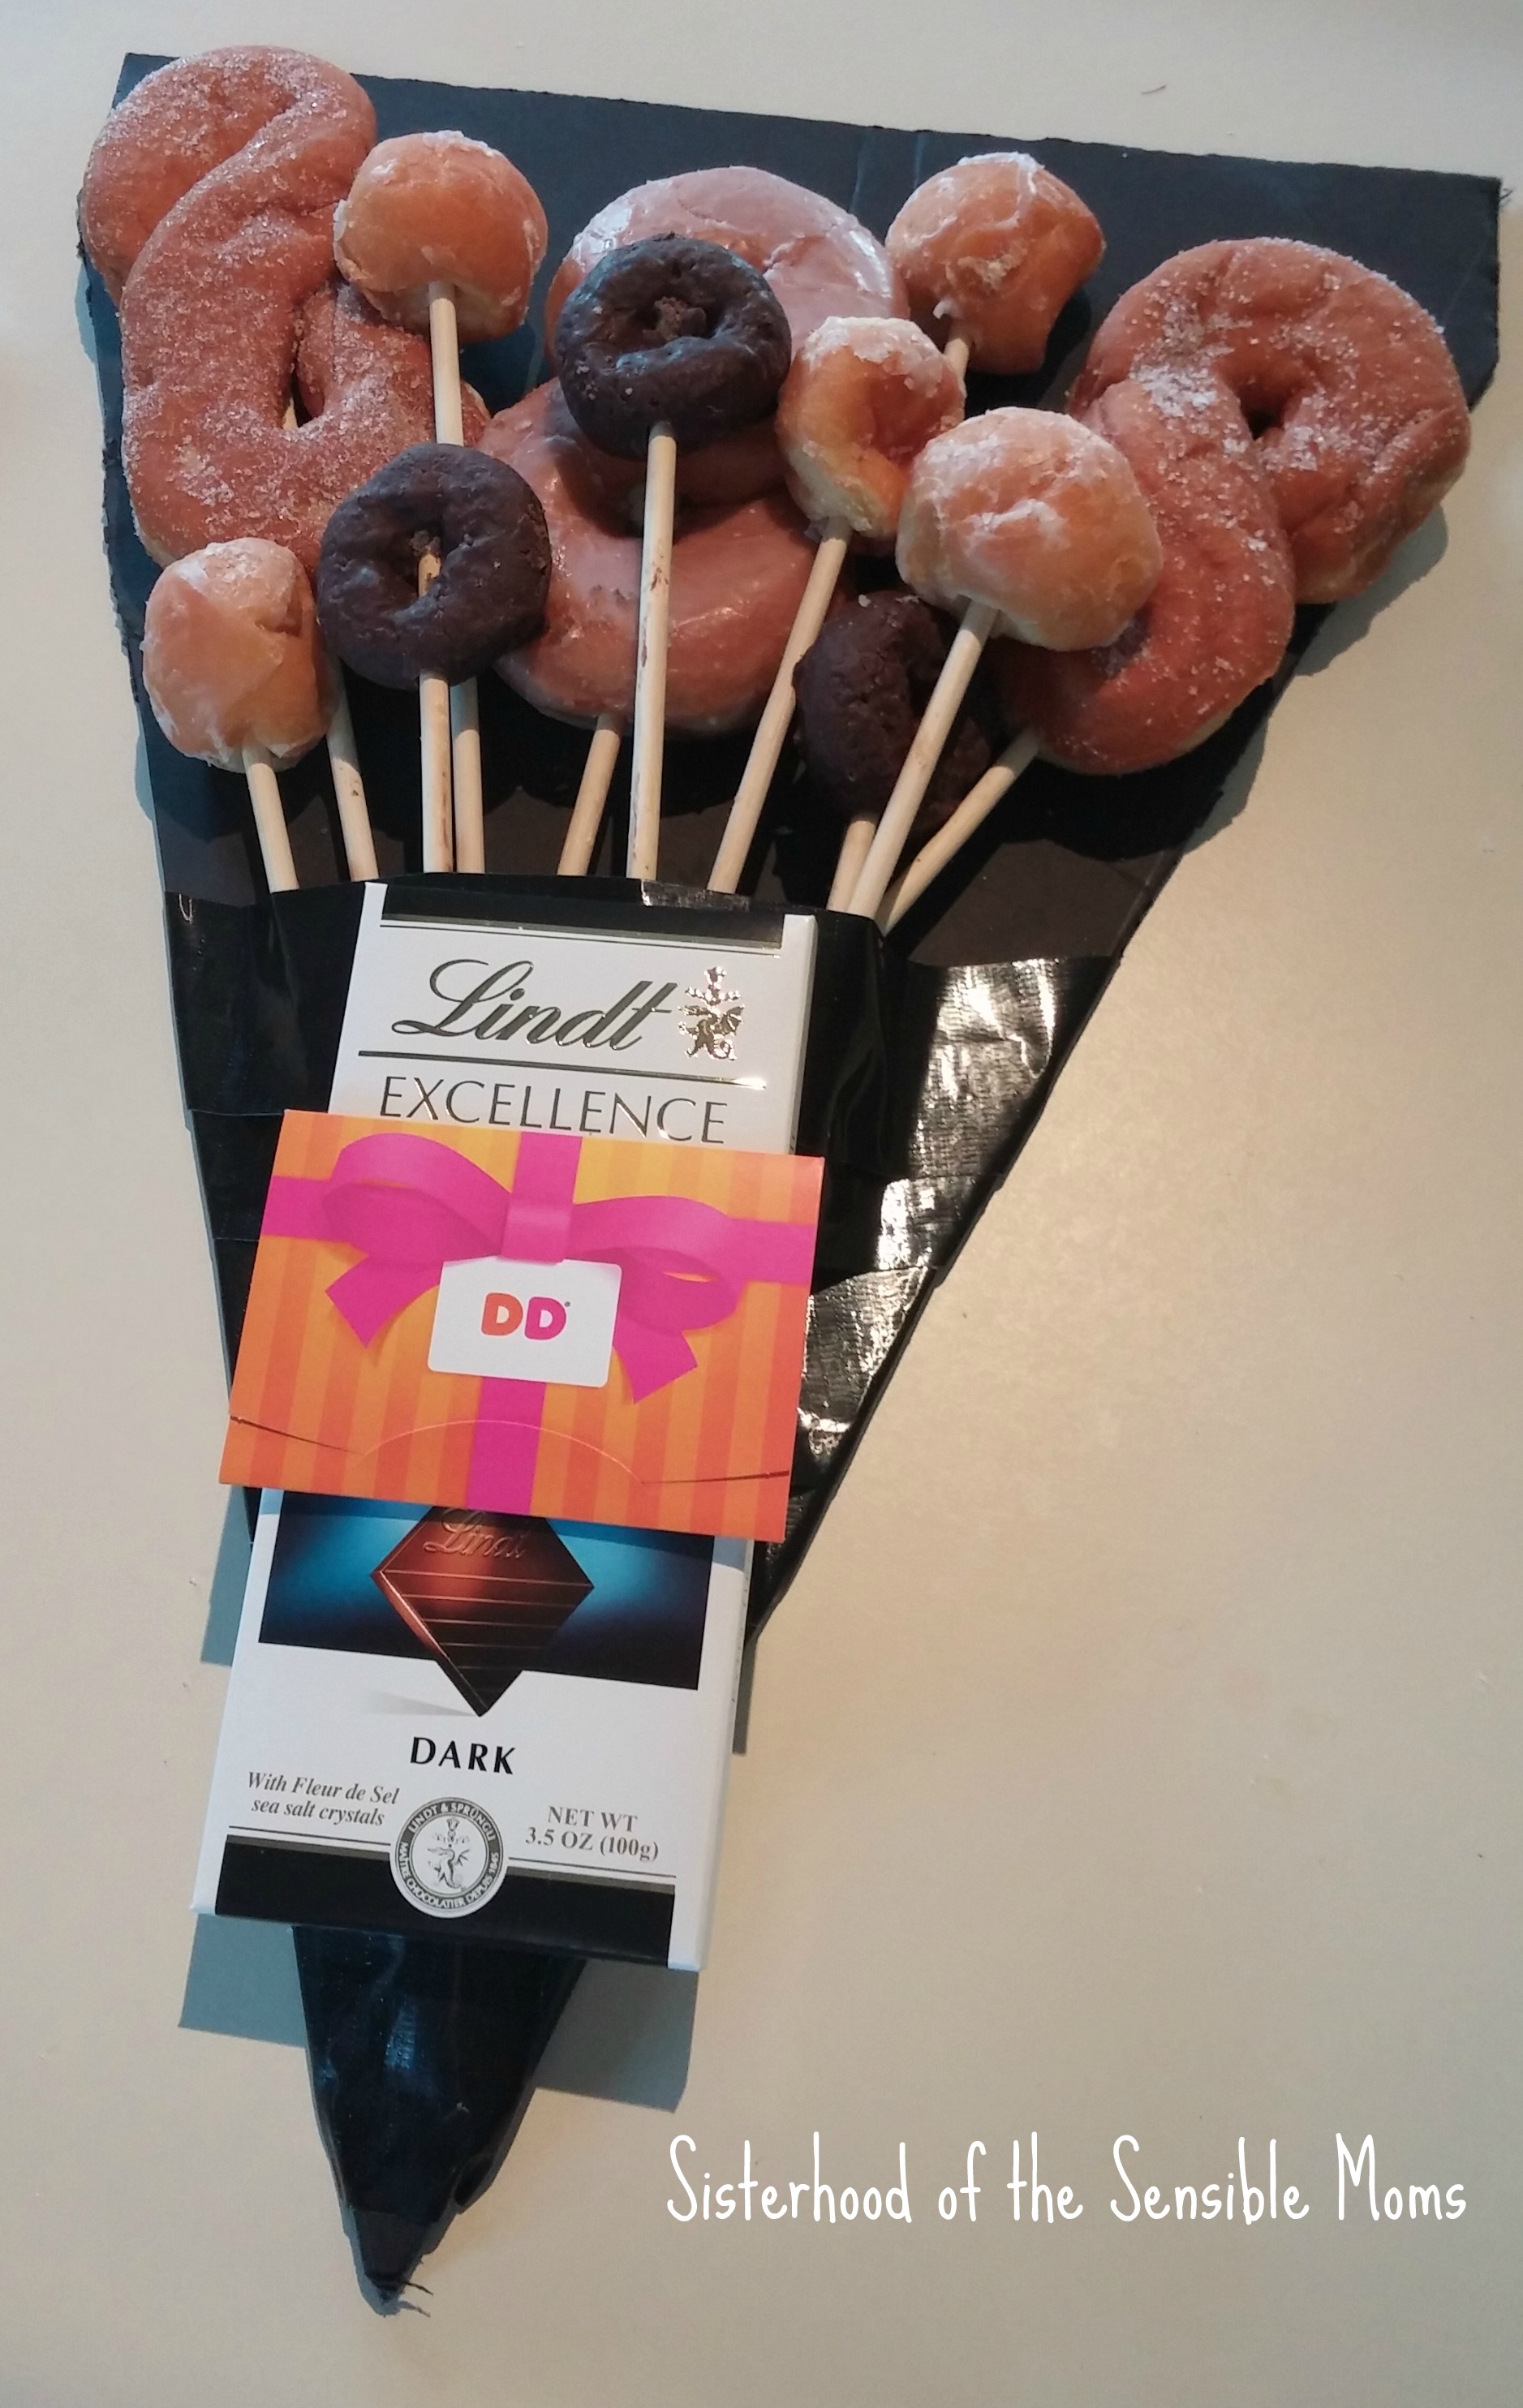
2. Carefully put your donuts on the skewers. Not going to lie, I wrecked a couple of the smaller donuts and donut holes. Make sure you have extra. Lay your arrangement out on your board and start duct taping into place. I used tape that matched my board, but you could do something more decorative or contrasting. Duct tape choices are limitless nowadays.

How to Make a Donut Bouquet (Tutorial). Deliciously perfect gift for National Donut Day or any occasion! Quick, easy, and impressive: everything a craft project should be. | Sisterhood of the Sensible Moms

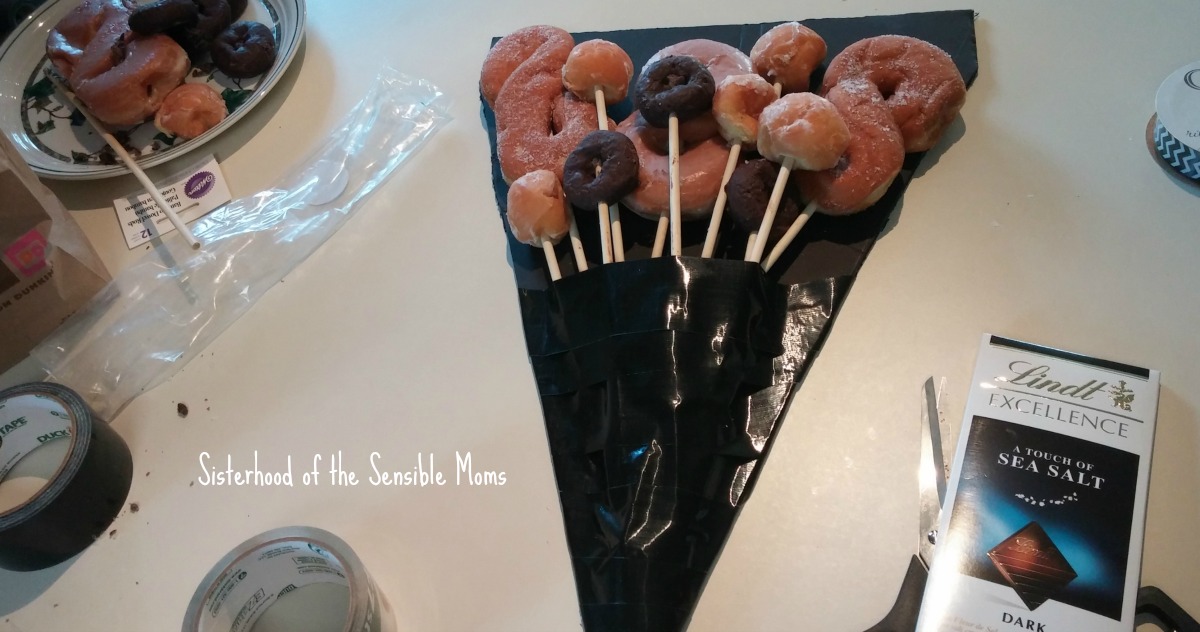
3. Using clear packaging tape loops, I attached the candy bar to dress it up. I also added a Dunkin’ Donuts gift card.

How to Make a Donut Bouquet (Tutorial). Deliciously perfect gift for National Donut Day or any occasion! Quick, easy, and impressive: everything a craft project should be. | Sisterhood of the Sensible Moms

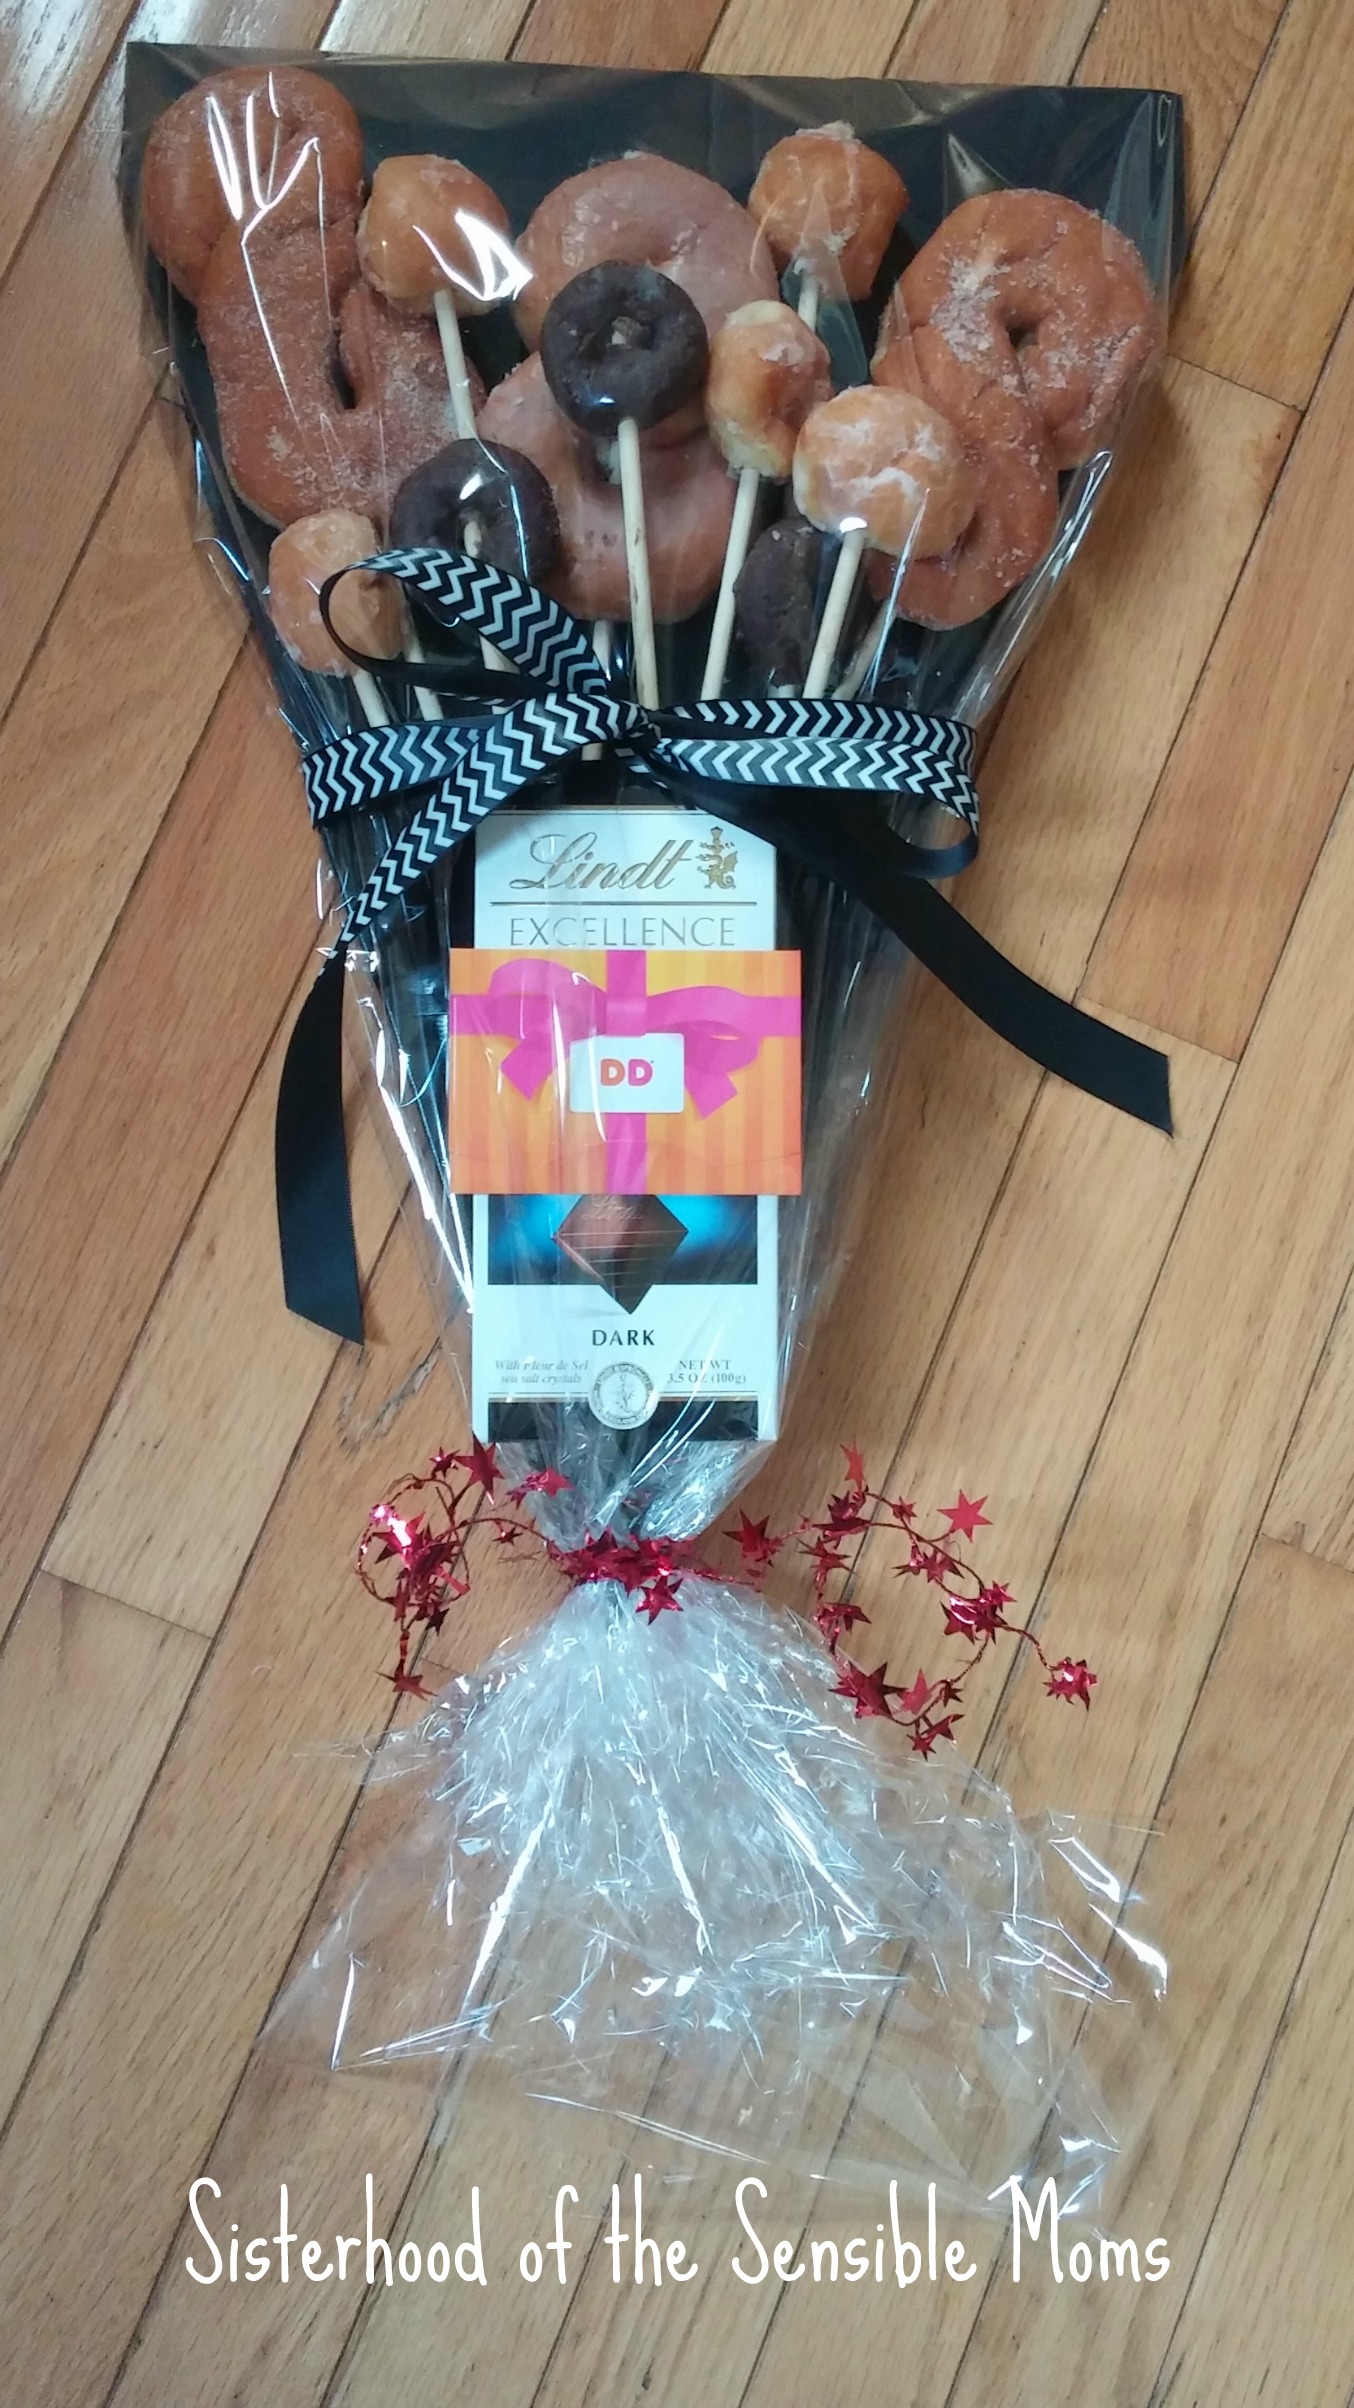
4. Next I measured out the cellophane: twice the height of my project plus 14 inches. I laid the cellophane out on my counter and placed my bouquet on it so there was 7 extra inched below the pointy end. I folded the cellophane over the the top of the bouquet and secured it at the bottom with the wire garland. I folded the sides under the board and secured them with clear packaging tape. Then I added the ribbon.

How to Make a Donut Bouquet (Tutorial). Deliciously perfect gift for National Donut Day or any occasion! Quick, easy, and impressive: everything a craft project should be. | Sisterhood of the Sensible Moms


This really is one of the easier projects I have gotten myself into. While it is perfect for National Donut Day, it is swell for most any occasion. Remember that famous quote that I am making up right now: “A donut makes any day better.”

Ellen

You can follow us on Google+, Twitter, Facebook, Instagram, and Pinterest.

Check out our books, “I Just Want to Be Alone” and “You Have Lipstick on Your Teeth.”


Enter your email address: Delivered by FeedBurner


Print Friendly, PDF & Email
Share it real good . . .
Share on FacebookTweet about this on TwitterPin on PinterestShare on Google+Share on StumbleUponShare on RedditEmail this to someonePrint this page

Three Easy Container Garden Tips to Give You More Bang for Your Buck

Once upon a time, I gardened, I mean REALLY gardened. Flowers were my thing. Our first home was a townhouse and I spent the better part of a year transforming our postage stamp backyard into an oasis with pea gravel paths and carefully planned beds where texture, color and size were all carefully deliberated and coordinated. I even scoured catalogs to mail order plants that were not readily found at my local nursery. Just swish that sort of free time around in your temporal lobe for a second and savor it.

Then we moved to our current three acre homestead when I was 99.89% ready to pop with my firstborn. Not only was the vastness of the space overwhelming, it looked like a prairie. I’m talking swaying hip-high grasses that could have hidden a cheetah for all I knew. Let’s just say it was about a half a second from being foreclosed upon and the owners had bigger woes to worry about than curb appeal. We had to get a farmer to bale it. Yes, my yard was freaking harvested. It was enough to make a pregnant woman weep, or at the very least, give up.

Seventeen years later, I still don’t have a proper garden because . . . life. With tasks like finding a very specific red shin guard sleeve crowding my to-do list, it doesn’t leave oodles of time to hunt down the perfect blush pink iris. But my landscaping looks kinda good-ish, at least around the pool, and I still cultivate a beauty or two. My hydrangeas kicked butt and provoked envy this year.

Three Easy Container Garden Tips to Give You More Bang for Your Buck | DIY Garden Design Principles | Sisterhood of the Sensible Moms

Basically, a lot of my much divided attention nowadays drifts toward two things: hardscape and containers. First hardscape because, oh my goodness, when it’s done, you’re done. I am a fan of permanent wow factors. Second, container gardening is dear to my heart because, well, it is so contained. A little plot of a garden would look lost in my yard, but a well-planted and well-situated container gives a pop of interest. When you combine hardscape with beautiful planters, well my friend, you have achieved the sweet spot for lazy easy gardening.

Here are three quick tips to make the most out of your containers.

Three Easy Container Garden Tips to Give You More Bang for Your Buck | DIY Garden Design Principles | Sisterhood of the Sensible Moms


1. Drainage

The major drawback to container gardening is the watering. They pretty much need a daily dousing to survive, but over-watering is a deadly sin too. They’re kind of like the Goldilocks of gardens. The key to keeping them “just right” is proper drainage. The easiest solution is a pot with a drainage hole, but sometimes your container is in a location where muddy water seeping out of the bottom would not be ideal, like next to a pool. If you have a solid pot, you need something in the bottom to provide a space for drainage. Gravel is the standard material, but it is heavy to haul and if your pot has any size to it, adding gravel makes it almost impossible to move.

I hit upon using my old, busted pool noodles in the bottom for drainage. Even if you don’t have old ones to use, you can find them cheaply at the dollar store or buy them from Amazon here. See the full step-by-step here.

Use Pool Noodles in Your Container Gardening | Recycling is good! Plus other helpful tips! | Sisterhood of the Sensible Moms


2. Fertilizing

Okay, this might seem like a big fat “Duh!” but you have to remember I’m really kind of a lazy gardener. So my pots stay out all winter . . . maybe even with the dead plants still in them. Did I mention I hate winter? Anyway, in one of my pots a ton of soil washed out so I tossed in some of the Miracle-Gro potting mix I still had from the pool noodle potting project. Let me be clear, the other poor little pot got none.

Three Easy Container Garden Tips to Give You More Bang for Your Buck | DIY Garden Design Principles | Sisterhood of the Sensible Moms

The results were so remarkable that even others noticed. “What happened with those puny flowers?” Favoritism. Favoritism is what happened. So if you’ve ever wondered if fertilizing matters, it does. And no worries, I added some Miracle-Gro to the pitiful one because playing favorites is not my thing. Remember, laziness is my thing.


3. Give Some Pop With Rocks

This is where hardscape meets container gardening to help achieve the design rule of three. What? I had electives in art history and architecture in college. Basically, odd-numbered pairings provide more harmony and force movement of the eye to create visual interest. Why do three objects create this feeling while four does not? I don’t know, I didn’t take that many classes, I was a microbiology major for goodness’ sake, but I do know the feeling of balance is real.

So where one big planter plopped down by the fence is pretty, a pot balanced with two other objects is much more interesting. I used larger rocks to add this interest and then took it one step farther to make it even MORE interesting.

Fast and Easy! How to Make Your Landscape Pop With Rocks | DIY Garden Design Principles | Sisterhood of the Sensible Moms

You know how wet rocks have a depth of color to them that just isn’t there when they’re dry? I created a permanently “wet” appearance simply by brushing them with glossy outdoor polyurethane.

So this:

Fast and Easy! How to Make Your Landscape Pop With Rocks | DIY Garden Design Principles | Sisterhood of the Sensible Moms

Became this:

Fast and Easy! How to Make Your Landscape Pop With Rocks | DIY Garden Design Principles | Sisterhood of the Sensible Moms

See how that gorgeous red vein of color pops out? And I just brushed the poly on the rocks right where they lay. This isn’t really a project that requires perfection. I did make sure the forecast was clear for at least 24 hours so that they had time to dry. Know also that the can of polyurethane will be ruined for other projects because no matter much you scrub the rocks, dirt still ends up in the can. Use a brush you can throw away, too. While I’m usually a fan of foam brushes, I found that one with bristles worked better for this project to get into the nooks and crannies and to get under the edges of the rocks.

Here is one more:Fast and Easy! How to Make Your Landscape Pop With Rocks | DIY Garden Design Principles | Sisterhood of the Sensible Moms

The finish has held up for well over a year now. Here’s one featured in the Rule of Three.

Fast and Easy! Lanscaping with the Rule of Three | DIY design principles for your garden. Sisterhood of the Sensible Moms

By the way, this is the puny pot about five weeks after I added Miracle-Gro.

Now go forth to drain, fertilize, and pop! Bet you never got a directive like that before.

-Ellen

Can’t get enough of projects with rocks? See how to make this foot washing station here.

Foot Washing Station

Follow_us_on_Pinterest_pic

You can follow us on Google+, Twitter, Facebook, Instagram, and Pinterest.

Check out our books, “I Just Want to Be Alone” and “You Have Lipstick on Your Teeth.”


Enter your email address:Delivered by FeedBurner


Print Friendly, PDF & Email
Share it real good . . .
Share on FacebookTweet about this on TwitterPin on PinterestShare on Google+Share on StumbleUponShare on RedditEmail this to someonePrint this page